Can red and yellow wires go together on a car stereo? Yes, they can, and often must, go together to power your car stereo correctly. The red wire typically supplies the 12V constant power to the stereo, allowing it to retain memory settings like radio presets and equalizer adjustments. The yellow wire, on the other hand, usually provides the 12V switched power (also called accessory power), which turns the stereo on and off with the ignition. When installing an aftermarket stereo, these two wires are crucial for proper functionality.
This guide will delve deep into the world of car stereo wiring, helping you navigate the often-confusing connections, especially concerning those vital red and yellow wires. We’ll explore what they do, why they’re important, and how to connect them safely and effectively for a seamless aftermarket stereo installation.
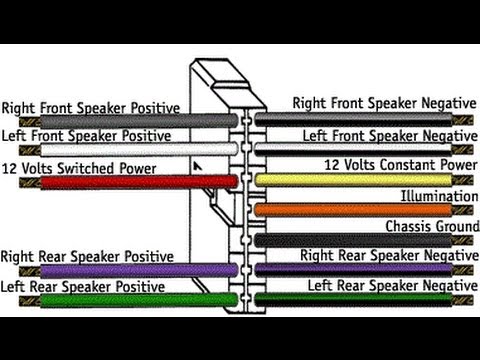
Image Source: i.ytimg.com
Decoding Your Car Stereo Wiring
When you decide to upgrade your car’s audio system, the first hurdle can be deciphering the tangle of wires that make up the car stereo wiring harness. Each color serves a specific purpose, and getting them wrong can lead to a non-functional stereo, blown fuses, or worse, damage to your vehicle’s electrical system.
The Essential Wires: Red and Yellow
Let’s break down the most common roles of the red and yellow wires in your car stereo wiring diagram:
-
Red Wire: The 12V Constant Power Source
- This wire is directly connected to your car’s battery.
- It provides a constant supply of 12-volt power, even when the ignition is off.
- Its primary job is to maintain the stereo’s memory. This means your radio presets, clock settings, EQ adjustments, and other personalized preferences are saved.
- Without the red wire properly connected, your stereo will reset every time you turn off the ignition, forcing you to re-enter all your settings each time.
-
Yellow Wire: The 12V Switched Power (Accessory Power)
- This wire is connected to a circuit that receives power only when the ignition key is turned to the “accessory” (ACC) or “on” position.
- It acts as the “on/off” switch for your stereo. When the ignition is off, this wire has no power, and the stereo turns off.
- This is important for preventing unnecessary battery drain when the car is not in use.
Why They Connect (and Sometimes Don’t)
In most aftermarket car stereos, the red and yellow wires are designed to be connected to corresponding wires in your car’s radio wiring harness. This connection allows the stereo to receive both constant power for memory and switched power for operation.
Scenario 1: Connecting Red to Yellow (Common in Older Vehicles or Specific Installations)
In some older vehicles, or in specific aftermarket setups, the factory wiring might not have separate constant and switched 12V sources readily available in the radio harness. In such cases, you might find that both the constant power and the switched power for the stereo come from the same wire. If this is the case, you would connect both your aftermarket stereo’s red and yellow wires to that single source wire from the vehicle. This is often done via a common adapter or by carefully identifying the correct wire in the vehicle’s harness.
Scenario 2: Connecting Red to Constant, Yellow to Switched (The Standard)
The most common and ideal scenario for proper stereo connection is to connect the red wire of your stereo to the constant 12V source in your car and the yellow wire to the switched 12V source. This ensures your stereo functions correctly, retains its memory, and doesn’t drain your battery when the car is off.
Important Note: Always consult your specific car stereo’s installation manual and a stereo wiring diagram for your vehicle’s make and model. Generic advice can only go so far, and the actual wiring colors can vary.
Beyond the Basics: Other Crucial Car Stereo Wires
While red and yellow are often the most discussed, a complete car stereo wiring job involves understanding several other wires:
Speaker Wire Colors and Connections
The sound you hear comes from your speakers, and their wiring is just as important. You’ll typically find that speaker wires are paired and color-coded.
- Positive and Negative Wires: Each speaker has a positive (+) and a negative (-) wire. It’s critical to connect these correctly. Reversing the polarity (connecting positive to negative and vice versa) will result in out-of-phase sound, causing the bass to cancel out and a generally poor audio experience.
- Common Color Coding (May Vary):
- Front Left: White (positive), White/Black (negative)
- Front Right: Gray (positive), Gray/Black (negative)
- Rear Left: Brown (positive), Brown/Black (negative)
- Rear Right: Green (positive), Green/Black (negative)
- Connecting to Your Stereo: Your aftermarket stereo will have output wires for each speaker, usually color-coded similarly. You will connect the positive of the stereo to the positive of the speaker, and the negative of the stereo to the negative of the speaker.
Ground Wire
- Black Wire: This is your ground wire. It needs to be connected to a clean, unpainted metal surface on your car’s chassis. A solid ground connection is essential for the stereo to function correctly and to prevent electrical noise and interference. A poor ground can cause all sorts of strange issues, from crackling sound to the stereo not turning on at all.
Antenna Power (Blue Wire)
- Blue Wire: Often referred to as the “power antenna” or “remote turn-on” wire.
- Power Antenna: If your car has a power antenna that retracts when the stereo is off, this wire powers it.
- Remote Turn-On: If you’re installing an external amplifier, this wire is used to turn the amplifier on and off along with the stereo. It sends a signal to the amplifier when the stereo is powered on.
Illumination/Dimmer Wire
- Orange or Orange/White Wire: This wire is typically connected to your car’s dash illumination circuit. When you turn on your headlights or dim your dashboard lights, this wire receives power. Connecting it allows your stereo’s display to dim automatically with your car’s dashboard lights, making it easier on your eyes at night.
Ensuring a Safe and Proper Stereo Connection
Making the correct car stereo wiring connections is paramount for both the longevity of your new stereo and the safety of your vehicle.
The Importance of Fuses
- Inline Fuses: Car stereos have built-in fuses to protect them from power surges. Your aftermarket stereo’s wiring harness will have a fuse, usually on the yellow (constant power) wire. Never bypass or remove this fuse.
- Vehicle Fuses: Your car’s fuse box also protects various circuits. If your stereo suddenly stops working, check the fuse in the stereo’s wiring harness and the fuse in your car’s fuse box designated for the radio or accessory circuit.
Wire Gauge for Car Audio
The wire gauge for car audio refers to the thickness of the wire. Using the correct gauge is essential for efficient power delivery and heat management.
- Thicker Wire (Lower Gauge Number): Thicker wires have less resistance, allowing more current to flow with less heat generation. This is crucial for high-power systems and longer wire runs.
- Thinner Wire (Higher Gauge Number): Thinner wires have more resistance and can overheat, especially under heavy loads.
| Component/Wire | Recommended Gauge | Notes |
|---|---|---|
| Stereo Power (Yellow) | 14-16 AWG | For standard head units. Higher wattage may require thicker wire. |
| Stereo Ground (Black) | 14-16 AWG | Ensure a solid connection to the chassis. |
| Speaker Wires | 16-18 AWG | For standard installations. Lower impedance or higher power speakers might need 14 AWG. |
| Amplifier Power | 4-8 AWG | Depends heavily on amplifier wattage. Always use thicker wire for amplifiers. |
| Amplifier Ground | 4-8 AWG | Must be the same gauge as the power wire and connected directly to the chassis. |
Note: AWG stands for American Wire Gauge. A lower AWG number means a thicker wire.
Connecting Components
When connecting wires, stripping a small amount of insulation and twisting the wires together is a temporary method, but it’s not ideal for a permanent, reliable connection.
- Crimp Connectors: Using crimp connectors (butt connectors, spade connectors, ring terminals) is a more secure and professional method. Ensure you use the correct size connector for the wire gauge and crimp them firmly.
- Soldering: For the most robust connection, soldering the wires together after crimping can provide excellent conductivity and prevent any chance of wires coming loose. Always use heat-shrink tubing to insulate soldered connections properly.
- Wiring Harness Adapters: The easiest and safest way to connect an aftermarket stereo is by using a vehicle-specific radio wiring harness adapter. These adapters plug into your car’s factory harness on one end and have wires that match your aftermarket stereo’s wiring harness on the other, often with color-coded connectors. This eliminates the need to cut or splice into your car’s original wiring.
Amplifiers and Advanced Wiring
If your aftermarket stereo installation includes an amplifier, the wiring becomes more complex.
Amplifier Wiring Essentials
- Power Wire (Usually Red or Yellow): This is the main power feed from the battery. It’s typically a much thicker gauge wire than used for the head unit alone and requires a fuse within a few inches of the battery terminal.
- Ground Wire (Black): Crucial for amplifier performance. Must be the same gauge as the power wire and connected to a clean, short run to the vehicle chassis.
- Remote Turn-On Wire (Blue): Connects to the stereo’s blue wire to turn the amplifier on and off with the head unit.
- RCA Cables: These carry the audio signal from the stereo to the amplifier. They should be run separately from power wires to avoid interference.
- Speaker Wires: These carry the amplified signal from the amplifier to your speakers.
Speaker Impedance and Power Handling
- Speaker Impedance: Measured in Ohms (Ω), impedance is the resistance to the flow of electrical current. Most car speakers are 4 Ohms, but some might be 2 Ohms or 8 Ohms.
- Matching Impedance: It’s vital to match the speaker impedance to what your amplifier or stereo is designed to handle. Connecting speakers with a lower impedance than the amplifier is rated for can cause the amplifier to overheat and potentially be damaged. Always check your stereo and amplifier specifications for compatible speaker impedance.
Troubleshooting Common Wiring Issues
Even with a good stereo wiring diagram, problems can arise.
Stereo Not Turning On
- Check the fuse in the stereo’s wiring harness.
- Ensure the yellow wire (switched power) is connected to a live accessory circuit in the car. Use a test light to confirm power.
- Verify the ground connection is solid and to a clean metal surface.
Stereo Powers On but No Sound
- Check speaker wire colors for proper connections to both the stereo and the speakers.
- Ensure positive and negative wires for each speaker are connected correctly.
- If using an amplifier, check the remote turn-on wire and the RCA connections.
Stereo Loses Memory
- The red wire (constant power) is likely not connected or has a faulty connection. Ensure it’s connected to a constant 12V source.
Crackling or Popping Sound
- This often indicates a poor ground connection.
- It can also be caused by RCA cables running too close to power wires, causing interference.
Frequently Asked Questions (FAQ)
Q1: Can I connect the red and yellow wires directly together if my car only has one wire for power?
A1: In some very specific scenarios, yes, if you have confirmed that a single factory wire provides both constant and switched power (which is rare and requires careful testing). However, for most aftermarket stereos, it’s best to separate them. If your car’s factory harness only has one power input wire, you’ll need to use a wiring adapter or identify both a constant and switched 12V source within your car’s wiring to ensure proper operation and memory retention.
Q2: What happens if I cross the red and yellow wires?
A2: If you accidentally connect the stereo’s red wire (constant power) to the car’s switched power and the yellow wire (switched power) to the car’s constant power, your stereo will likely turn on with the ignition but will lose its memory every time the car is turned off. This is because the roles are reversed.
Q3: Do I need a wiring harness adapter?
A3: While not strictly mandatory, using a vehicle-specific radio wiring harness adapter is highly recommended. It simplifies the installation process, prevents accidental damage to your car’s original wiring, and ensures a clean, professional connection.
Q4: How do I know which wire in my car is the constant and switched power?
A4: The best way is to consult a stereo wiring diagram for your specific vehicle. Alternatively, you can use a multimeter or a test light. Turn the ignition key to the “off,” “accessory,” and “on” positions.
* A constant 12V source will have power in all positions.
* A switched 12V source will only have power when the key is in the “accessory” or “on” position.
Q5: Can I connect the speaker wires to the wrong polarity?
A5: Yes, you can. If you connect the positive and negative wires of a speaker incorrectly, the speaker will play out of phase with others. This leads to a significant loss of bass and a distorted stereo image. Always ensure correct polarity for all speaker connections.
Conclusion
Connecting the red and yellow wires on your car stereo might seem like a small detail in a larger aftermarket stereo installation, but it’s a critical one for proper functionality and convenience. By correctly identifying and connecting these wires, along with paying attention to other essential connections like speaker wires and ground, you can ensure your new car stereo delivers the crisp sound and reliable performance you expect. Always prioritize safety, consult your wiring diagrams, and consider using adapters for a smooth and secure installation. Happy listening!